Air conditioning is one of the hardest-working systems in an Australian home. Through long, humid summers and cool winters, a reverse cycle split system runs for months at a time with little thought from most owners, right up until the moment it stops working. That breakdown rarely comes out of nowhere. In most cases, it’s the result of months or years of minor neglect adding up things that regular, basic maintenance could have caught long before they became a problem.
The good news is that a significant portion of air conditioner maintenance is something any homeowner, tenant, or property manager can do themselves with no special tools and no technical knowledge. Not all of it, though. Some tasks absolutely need a licensed technician, and knowing the difference between what you can safely tackle and what you should leave alone is just as important as the maintenance itself.
This guide walks through everything clearly: what you can do, how to do it, how often, what problems you can troubleshoot yourself, and what always warrants a professional callout.
Why Regular Air Conditioner Maintenance Matters
Before getting into the how-to, it’s worth understanding what’s actually at stake.
A poorly maintained air conditioner doesn’t just use more electricity. It cools and heats less effectively, wears out faster, creates worse indoor air quality, and is more likely to break down at the worst possible time, typically the middle of a 38°C afternoon in January. Regular AC maintenance ensures system longevity, reduces energy bills, and improves air quality. Professional AC maintenance once or, ideally, twice a year is recommended for Australian homes, with regular check-ups potentially saving up to 30% on energy bills and extending a system’s lifespan.
If you leave filters and air conditioning coils uncleaned, the compressor or fans can fail prematurely. Dirty filters and coils can also lead to short cycling, which is one of the most common and damaging air conditioner problems.
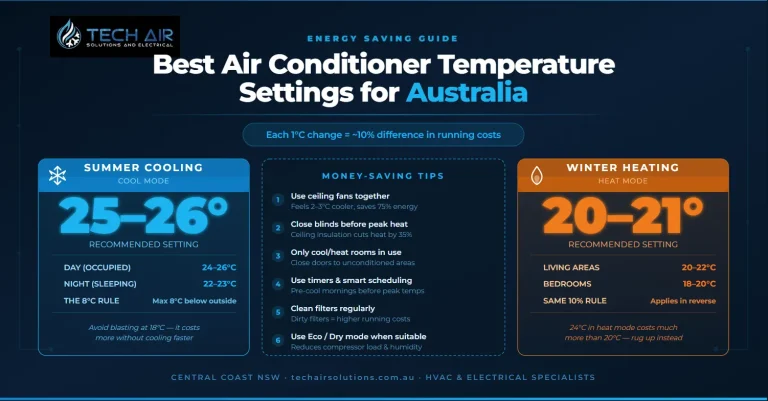
The relationship between maintenance and running cost is also very direct. As we covered in our guide on the best air conditioner temperature settings for energy saving in Australia, a clean, well-maintained unit operating at sensible temperature settings costs dramatically less to run than a neglected one fighting through blocked filters and dirty coils.
A practical way to think about it: your split system is like a car. You can do the basic things yourself (fill the tyres, check the oil, wash it), but you still need a mechanic once a year for the deeper service. Same principle applies here.
Know What You Can and Cannot Do
In Australia, there are very clear legal boundaries around what you’re allowed to do to your own air conditioner.
What you CAN do yourself:
-
- Clean and reinstall air filters
-
- Wipe down the indoor unit casing and louvres
-
- Clear debris and trim vegetation around the outdoor unit
-
- Flush the condensate drain line
-
- Clean the outdoor condenser fins with a gentle hose rinse
-
- Check and replace pipe insulation on the suction line
-
- Basic fault-finding and troubleshooting (checking power, settings, timers, remote batteries)
What you CANNOT legally do yourself:
-
- Handle, top up, or recover refrigerant (requires an ARC licence)
-
- Open sealed refrigerant circuits or disconnect refrigerant lines
-
- Perform any electrical wiring work (requires a licensed electrician)
-
- Install or replace any internal electrical components
As a general rule, you shouldn’t attempt any split system maintenance beyond what you can see on the surface. You can clean the outside of both units and replace the filters in your indoor unit, but you should never pull anything apart or try to clean inside the units. DIY split system maintenance beyond this can lead to unintended damage and voided warranties.
Refrigerant in particular is something to treat seriously. It’s hazardous to handle without proper equipment, and in Australia, handling refrigerant without an ARC (Australian Refrigeration Council) licence is illegal regardless of what’s in your toolbox or your level of confidence.
How Often Should You Service Your Air Conditioner?
There’s no single answer that fits every situation, but here’s a practical guide:
Get professional air conditioning
& electrical advice.
| Task | Frequency |
|---|---|
| Clean indoor air filters | Every 4–6 weeks during heavy use |
| Wipe down indoor unit casing | Monthly |
| Check outdoor unit clearance and remove debris | Monthly |
| Flush condensate drain | Every 3 months |
| Inspect suction line pipe insulation | Every 6 months |
| Clean outdoor condenser fins | Every 6 months |
| Full professional service | Annually (or every 12–18 months for light use) |
If you have pets, live near the ocean where salt air accelerates corrosion, or run your system virtually year-round as many Australian households do, lean toward the more frequent end of those intervals.
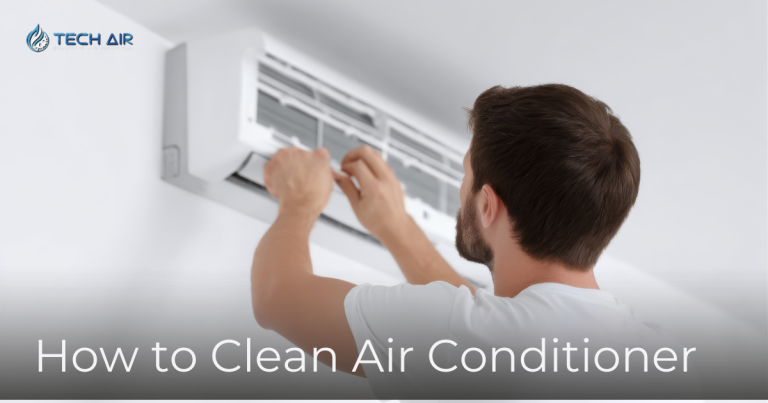
Step 1: Clean the Air Filters (The Most Important Task You Can Do)
This is the single most impactful thing you can do yourself. Dirty filters are the most common cause of reduced cooling performance, higher electricity bills, and premature system faults in Australian air conditioners.
Cleaning the dust filters every few weeks is recommended, but aim to do it at least twice a year. It’s usually a simple matter of popping open the plastic cover and removing the filter (or filters) and taking them outside for a good shake. You can wash them in warm, soapy water if they’re really grimy, but make sure they’re completely dry before you put them back in the unit.
Step-by-step filter cleaning:
- Switch the air conditioner off at the remote, then turn it off at the wall switch or isolator. Don’t just use the remote standby, actually cut power to the unit.
- Gently open the front panel of the indoor unit. On most split systems, this hinges upward or clips open at the sides. Your manual will show the exact mechanism for your model.
- Slide out the mesh filter panels. Most units have one or two rectangular mesh filters sitting in channels behind the front panel.
- Take the filters outside and give them a firm shake to knock off loose dust. Do this away from the house so the dust doesn’t re-enter through windows.
- If the filters are heavily soiled, rinse them under warm running water from the back side (so you’re pushing dirt out the way it came in), and gently clean with a soft brush or cloth if needed. Avoid high pressure which can warp the mesh.
- Leave the filters to dry completely in a shaded, ventilated spot. Never put wet filters back into the unit.
- Slide the dry filters back into position, close the front panel securely, and restore power.
That’s it. The whole process takes about 15-20 minutes and should be done at least once a month during heavy summer or winter use.
Our existing guide on how to clean your air conditioner goes into even more detail on this process, including how to clean the indoor unit casing and louvres safely.
One thing to check: Some units have secondary filters behind the main mesh filter, including activated carbon odour filters or anti-allergen filters. These are typically not washable and need periodic replacement. Check your manual for what your model has and how often they should be swapped out.
Step 2: Clean the Indoor Unit Casing, Louvres, and Vents
The outside of the indoor unit collects dust, grease (especially in kitchens), and general grime over time. This doesn’t just look bad, it can also restrict airflow from the louvres and introduce dust into the system.
What to do:
- Wipe the casing with a soft, lightly damp cloth. A mild all-purpose household cleaner works fine.
- Use a soft brush or the brush attachment on a vacuum to clean dust from the louvre blades (the adjustable fins that direct airflow).
- Never spray water or cleaning products directly onto or into the unit. Apply any liquid to your cloth first.
- Don’t poke anything into the vents or try to reach inside the unit beyond the filter area.
The louvres should be able to move freely when you set the unit to different airflow directions. If they feel stiff or make a clicking noise when adjusting, mention this at your next professional service.
Step 3: Maintain the Outdoor Unit
The outdoor condenser unit does one of the hardest jobs in your system, expelling heat to the outside air in summer and absorbing it in winter. Because it’s outside, it accumulates leaves, dust, spider webs, grass clippings, and whatever else the Australian outdoors throws at it.
To take care of your outdoor air conditioning unit, ensure trees, shrubs, and other vegetation don’t obstruct it. Overgrown vegetation can invade the unit and lead to damage, malfunction, and other issues. There should be a clear space surrounding the unit, and any leaves or debris that blow into the space should be removed regularly.
What to do with the outdoor unit:
First, always turn power off at the isolator switch (usually mounted near the outdoor unit on the wall) before doing any work on or around it.
Check the clearance around the unit. As a rule of thumb, aim for at least 200-300mm of clear space on the sides and around 500mm above the unit for adequate airflow. If vegetation has grown in, trim it back.
Remove any leaves, twigs, or debris that have accumulated on or inside the top grille. You can do this gently with a soft brush or gloved hand.
If the condenser fins (the thin metal grid on the sides of the outdoor unit) are coated in dust and grime, a gentle rinse with a garden hose from the outside can help. Keep the pressure low and spray from the outside in. Don’t use a pressure washer, as the fins are delicate and easily bent.
For the outside unit, it’s best if it’s not exposed to extreme temperatures. You don’t want the unit to be baking hot or freezing cold, as it will have to work harder and therefore cost you more. If your outdoor unit sits in full western sun all afternoon, consider whether a shade structure (keeping clearance requirements in mind) might be worth installing.
Coastal properties and salt air: If your property is within a few kilometres of the ocean, as many are on the Central Coast, salt air can corrode the condenser fins significantly faster than inland properties. A gentle hose rinse more frequently (monthly during summer) helps remove salt deposits before they cause lasting damage.
Step 4: Check and Flush the Condensate Drain
Your air conditioner removes moisture from the air when running in cooling mode. That water has to go somewhere, and it drains out through a condensate drain line, usually a small plastic tube running from the indoor unit to the outside of the building or into a drain point.
Over time, this drain line can develop algae growth, mould, or blockages from dust and debris. A blocked drain line results in water backing up inside the unit and eventually leaking out through the indoor unit casing, sometimes dripping onto walls, furniture, or flooring.
Step 5: Check the Suction Line Pipe Insulation
The refrigerant pipes running between your indoor and outdoor units include a larger, thicker pipe called the suction line. This pipe needs to be wrapped in foam insulation to prevent condensation forming on the outside and to maintain system efficiency.
Over time, particularly on pipes exposed to UV light, this foam insulation can crack, split, or fall away. Once it does, you’ll get condensation dripping along the pipe run, wetting walls or ceilings, and the system will run less efficiently.
What to check:
Look at the pipe run from the outdoor unit to where it enters the building. The insulation should be intact, dry, and firmly wrapped. If you see cracked, split, or missing sections, replacement foam pipe insulation (available from hardware stores) can be wrapped around the pipe and secured with UV-stable tape. This is a simple and fully legal DIY job that can make a genuine difference.
Common Air Conditioner Problems and What You Can Fix Yourself
Beyond routine maintenance, some faults can be diagnosed and sometimes resolved without calling a technician. Here’s an honest breakdown.
Problem: The Air Conditioner Is Not Cooling (or Heating) Properly
Before calling anyone, work through this checklist:
- Check the remote settings. Is it actually set to Cool mode (not Fan only or Dry)? Is the set temperature lower than the current room temperature? Is the timer set correctly and not overriding your settings?
- Check the remote batteries. A remote with dying batteries will appear to work but may not be sending commands reliably.
- Check the air filters. Blocked filters are the most common cause of reduced cooling performance. If they haven’t been cleaned in a while, this is almost certainly a contributor.
- Check whether the outdoor unit is running. Go outside and listen. The outdoor unit should be running when the indoor unit is on in cooling or heating mode. If the indoor unit is blowing but the outdoor is silent, that points to a fault that needs professional diagnosis.
- Check that nothing is blocking the indoor unit’s airflow. Furniture pushed directly under the unit, curtains draped over it, or a blocked return air grille can all reduce performance significantly.
If none of the above resolves the issue, setting the right temperature and verifying the room is appropriately sized for the unit is worth checking next. A unit installed in a room far larger than it was designed for will always struggle.
Problem: Water Is Leaking From the Indoor Unit
Small amounts of condensation on the indoor unit’s casing when running in cooling mode on a humid day is normal. Water dripping from the unit or soaking the wall below it is not.
The most likely cause is a blocked condensate drain line (see Step 4 above). Try flushing the drain first.
If flushing the drain doesn’t resolve it, or if you notice ice forming on the indoor unit, turn the system off and call a technician. Ice buildup on the evaporator coils is a sign of either severely blocked airflow (check those filters) or a refrigerant issue, the latter of which requires a licensed technician.
Problem: The Air Conditioner Keeps Turning Itself On and Off (Short Cycling)
Short cycling is when the system starts up, runs briefly, shuts off, then starts again repeatedly without ever reaching and maintaining the set temperature. It puts significant stress on the compressor and will shorten the system’s life if left unchecked.
Short cycling is when an air conditioner gets stuck in the start-up cycle of powering up the compressor, and turns on and off rapidly without ever reaching the thermostat’s temperature.
Causes you can check yourself:
- Dirty filters restricting airflow (clean them as per Step 1)
- Ice on the evaporator coils (turn the system off, let it defrost fully, check the filters, then restart)
- The outdoor unit is overheating because vegetation is too close or it’s blocked
Causes that need a professional:
- Low refrigerant charge due to a leak
- An oversized unit that’s the wrong size for the space (if this has been an issue since installation, understanding the correct size for your room helps you have an informed conversation with a technician)
- Electrical component faults in the control board, capacitor, or wiring
Problem: The Unit Is Making Unusual Noises
Different sounds point to different issues:
| Sound | Likely Cause | DIY or Pro? |
|---|---|---|
| Rattling or vibrating | Loose panel, debris inside the outdoor unit, fan blade contact | Check outdoor unit for debris first, then call a pro if it continues |
| Hissing or gurgling | Refrigerant issue | Professional only |
| Clicking when starting or stopping | Normal in most units, thermostat relay | Normal if occasional |
| Continuous clicking | Relay fault, electrical issue | Professional |
| Squealing | Fan motor bearing wear | Professional |
| Dripping | Condensate drain, see above | Start with DIY flush |
Never ignore hissing, gurgling, or any burning smell. These indicate faults that can worsen quickly and in the case of electrical odours, present a safety risk.
Problem: The System Has No Power at All
If the unit won’t turn on and there’s no response from the remote:
- Check your switchboard for a tripped circuit breaker or blown fuse on the air conditioning circuit.
- Check the isolator switch near the outdoor unit. It should be in the On position.
- Check the remote batteries.
- Try turning the unit off at the isolator, waiting 10 minutes, and restarting. Some units lock out after a fault and need a full power cycle to reset.
If none of the above restores power, call a licensed electrician or air conditioning technician. Never open your switchboard yourself or attempt to diagnose wiring faults.
Problem: The Remote Control Is Not Working Properly
This is an underrated source of frustration. Before assuming the unit has a fault:
- Replace the batteries. Remote control batteries drain faster than people expect.
- Check for direct sunlight hitting the indoor unit’s receiver sensor, this can interfere with signal reception.
- Make sure you’re within the range of the receiver (typically 8-10 metres, and in line of sight).
- If you’ve had a power outage, the unit’s internal clock and timer settings may have reset. Check the timer isn’t overriding your settings.
What a Professional Service Actually Includes
To understand what you’re paying for when you book a professional service, and why it’s genuinely different from what you can do yourself, here’s what a thorough professional service typically covers:
A standard service with an air conditioning professional typically includes a full clean and deodorise of filters and indoor housing unit, checking of supply and return air temperatures, cleaning of all indoor coils within the unit, checks of the evaporator drain, calibration of the remote control, inspection of outdoor coils and a full clean, inspection of the condenser fan for obstructions, a check of refrigerant levels, a check of all pipes and insulation, a check of condenser levels, and an analysis for any future updates and servicing needs.
The key tasks that only a licensed technician can perform are checking refrigerant levels and pressure, cleaning the evaporator and condenser coils properly (especially the internal sections), inspecting all electrical connections, and testing the system’s performance comprehensively.
Book a professional service annually as a minimum. If you run your system heavily year-round (which most Australian households do with a reverse cycle system), every 12 months is the right interval. If your property is coastal, has heavy pet hair, or the system has been showing any of the fault signs mentioned above, don’t wait for the annual mark.
Conclusion
Maintaining your own air conditioner is genuinely straightforward when you know what you’re doing and, equally importantly, where the limits are. Clean filters, a clear outdoor unit, a healthy drain line, and intact pipe insulation are things any homeowner can manage themselves, and doing them regularly makes a real difference to performance, efficiency, and system longevity.
The annual professional service covers the things you cannot safely or legally do yourself, and it catches small problems before they become expensive ones. Think of your DIY maintenance as keeping the system in good shape between services, not as a replacement for them.
If you notice any of the fault signs covered in this guide and your own checks don’t resolve the issue, call a licensed technician promptly. Air conditioners generally give you warning signs before a major failure. Responding to those warnings early is far cheaper than a breakdown repair during peak season.
Frequently Asked Questions
How often should I service my air conditioner in Australia?
A professional service once per year is the standard recommendation for most Australian homes. If you run your system year-round as a reverse cycle unit, or if you’re in a coastal or high-dust environment, consider servicing every 12 months without fail. For DIY maintenance like filter cleaning, every 4-6 weeks during heavy use is appropriate.
Can I clean the air conditioning coils myself?
You can gently clean the visible surface of the evaporator coils (the fins visible just behind the filters when the front panel is open) using compressed air or a very soft brush if they appear dusty. If they’re more heavily soiled, you should call an HVAC specialist, as water and electricity aren’t a friendly combination and deeper troubleshooting is best left to specialists. Never spray water directly onto internal coils yourself.
Why is my air conditioner blowing warm air?
The most common causes are: the unit is set to the wrong mode (check it’s on Cool, not Heat or Fan), the filters are blocked restricting airflow, the outdoor unit is not running (check for a tripped circuit breaker or debris around the outdoor unit), or the refrigerant charge is low. The first three you can check yourself. Low refrigerant requires a licensed technician.
Is it legal to service my own air conditioner in Australia?
You can legally perform basic cleaning and maintenance (filters, casing, outdoor unit clearance, drain flushing). You cannot legally handle refrigerant, perform electrical wiring work, or open sealed refrigerant circuits without the relevant licences. The ARC licence is required for any refrigerant handling, and electrical work requires a licensed electrician.
My air conditioner smells musty when it turns on. What is it and can I fix it?
A musty smell is typically caused by mould or bacteria growing in the drainage system or on the evaporator coils. Start by cleaning the filters thoroughly and flushing the condensate drain line with a diluted white vinegar solution. Running the system in Fan Only mode for 30-60 minutes after cooling use helps dry the internal components and reduce mould growth. If the smell persists after these steps, the coils themselves likely need a professional clean and deodorise treatment.
Can I use an air conditioner cleaning spray from the hardware store?
DIY coil cleaning sprays are available at hardware stores and can be used on accessible surfaces following the manufacturer’s directions. However, use these with significant caution. Many are foamy and leave residue that must drain out properly, and spraying into areas you can’t fully see or rinse creates more risk than benefit. For anything beyond surface accessible areas, a professional service with proper coil cleaning chemicals and pressure equipment is the better choice.
How long should an air conditioner last with proper maintenance?
A well-maintained split system air conditioner should last 15-20 years in most Australian conditions. Neglected systems commonly fail or become uneconomical to repair in 8-12 years. The investment in regular cleaning and annual professional servicing directly affects how long you get from the system before needing to replace it.